
CareCloud CDP Tutorials
How to Reduce Customer Churn with Automation: A Step-by-Step Guide
By Sabina Bednářová 25. 2. 2026 Tutorials Automation, Emailing, Loyalty
Are your customers slipping away? This guide shows how to reduce churn through segmentation, personalization, and automation. Follow our step-by-step guide to create your own win-back workflow and re-engage customers before it’s too late.

WHEN CHURN BECOMES A CHALLENGE
For the purpose of this article, we will use a fictional brand, Swiftmotion, a retailer of stylish activewear. In our example, it faces rising customer churn and uses the CareCloud platform to identify at-risk customers and bring them back through one complex automated workflow.
We’ll start by identifying customer segments most likely to churn. Next, we’ll create personalized email templates and SMS messages, followed by a time-limited discount. Finally, we’ll walk you through setting up the entire workflow.
TARGET THOSE WHO MAY LEAVE
You can either use your own customer segments or take advantage of CareCloud’s built-in RFM segmentation.
RFM segmentations are automatically calculated using percentiles, assigning customers to the right segment based on their purchasing behavior. In this guide, we’ll focus on three key segments:
About to Sleep: Customers with low monetary scores and average recency might soon lose interest in your brand. Without attention, they eventually degrade to Lost Customers.
Cannot Lose Them: These customers had high monetary value and used to be key spenders. However, they haven’t made a purchase in a while, and their frequency is starting to decline.
At Risk: These customers have reasonable monetary and frequency scores, but have had a long time since their last purchase. They are at immediate risk of losing the relationship with your brand.
With the segments defined, let’s move on to the Email Designer.
CREATE RELEVANT EMAIL CONTENT
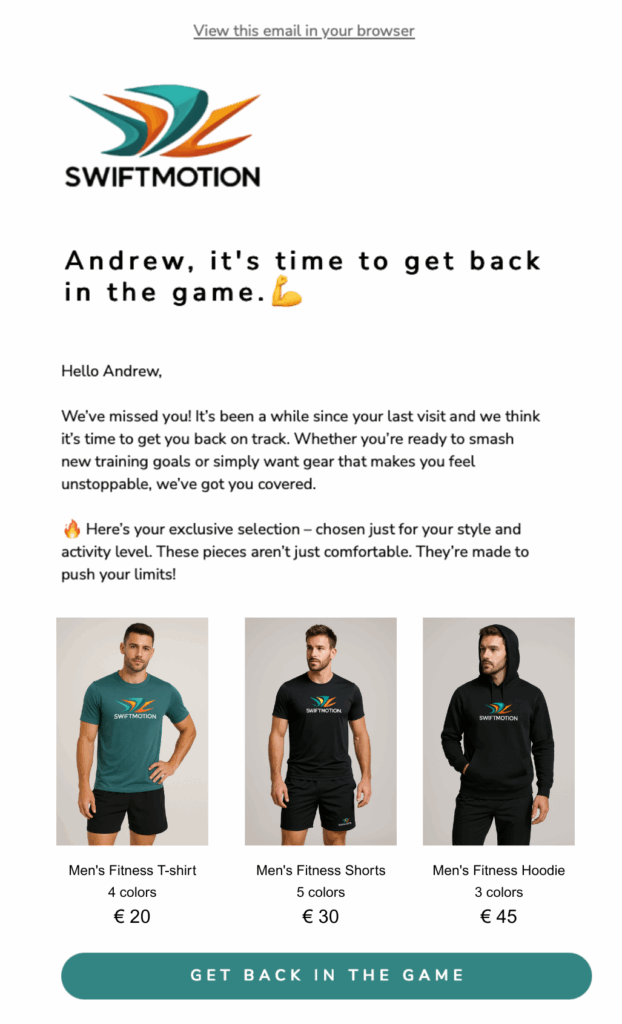
For this use case, we need to design three emails: a personalized product offer, an email with a discount voucher, and a reminder that the voucher is about to expire.
While the second and third emails are easy to create, the personalized product offer requires a bit more attention. So let’s take a look at it. To add personalized products to the email, select the Recommendation Engine and configure the basic settings.
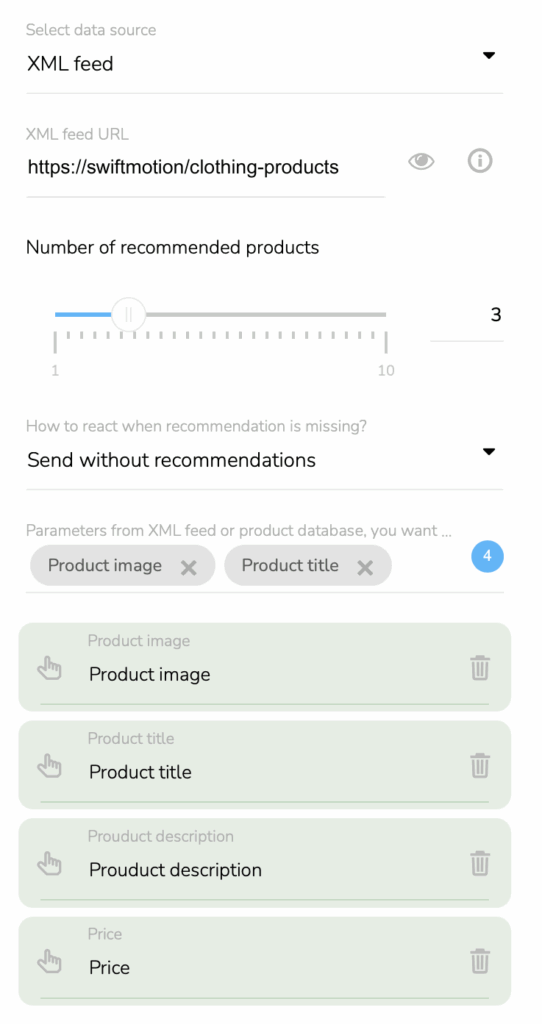
Insert the product feed URL, define the number of recommended items, how it will react in case the recommendation is missing, and lastly, what type of information you want to have in the email.
By default, products are displayed in a vertical list. If you prefer them side by side, click on the Layout icon and select the third option.

Adjust the spacing between the image and the title, and between product rows. When you are happy with the way it looks, you are done.
Now, we will move the SMS designer.
WRITE THE RIGHT MESSAGE
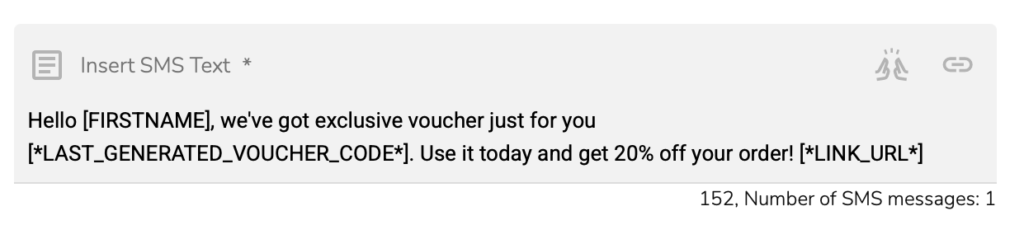
Go to the SMS Campaign Templates. Simply name the template and write a short message announcing that you’re sending them a 20% discount voucher.
To add the voucher to the SMS, click on the “Choose group of variables for personalization” and choose Marketing automation variables. Then click on the Choose variables for personalization and find “Code of last generated voucher”.
Let’s move to the Loyalty & Administration app to set one more component before we get to the automation workflow.
DISCOUNTS DRIVE ENGAGEMENT
To create a time-limited discount, go to the Campaign Rewards and choose Discounted product. In our example, customers will receive a 20% discount voucher. Check the screenshot below to see how to set it right:
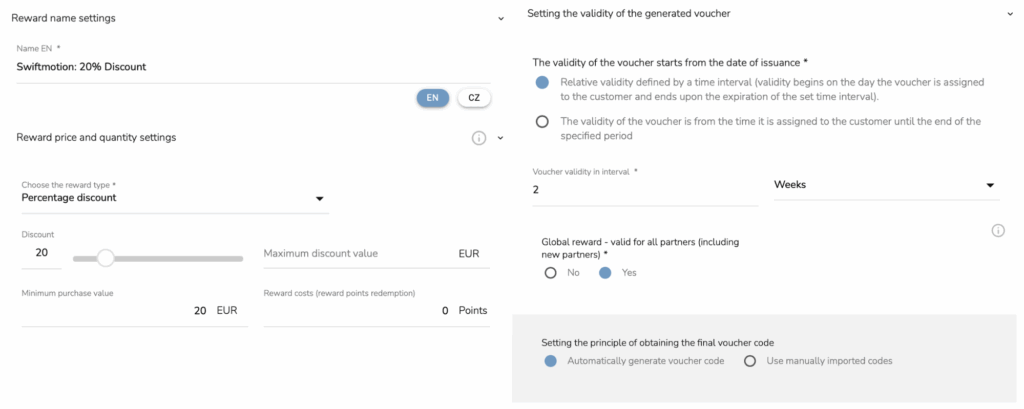
In this voucher setting, there are two things we’ll look at in more depth. We intentionally left the “Rewards conditions” section empty to ensure the discount applies to the entire product range without any restrictions.
At the same time, we set a condition that requires the customer to spend at least 20€ after the discount is applied. This ensures that the discount voucher is used only for meaningful purchases, helping to maintain campaign profitability.
Everything is now in place. It´s time for the final step: building the automation workflow.
AUTOMATE THE WHOLE JOURNEY
This monthly workflow begins by selecting customers from targeted RFM segments. It also ensures they haven’t been contacted in the last six months. This way, we remind customers of the brand without overwhelming them with excessive marketing communications.
If a customer qualifies, it checks for a known email address and sends a personalized product offer. After that, the workflow waits ten days before checking whether a purchase has been made. If not, it follows up with a discount voucher to provide an extra incentive. If there’s still no purchase after a reminder email, the workflow digs deeper to understand why the customer hasn’t responded.
At this point, there are usually two reasons for no engagement: the customer didn’t see the email, or they weren’t motivated by the offer. To address this, we add a condition that checks whether the email was opened. If not, we switch channels and send an SMS.
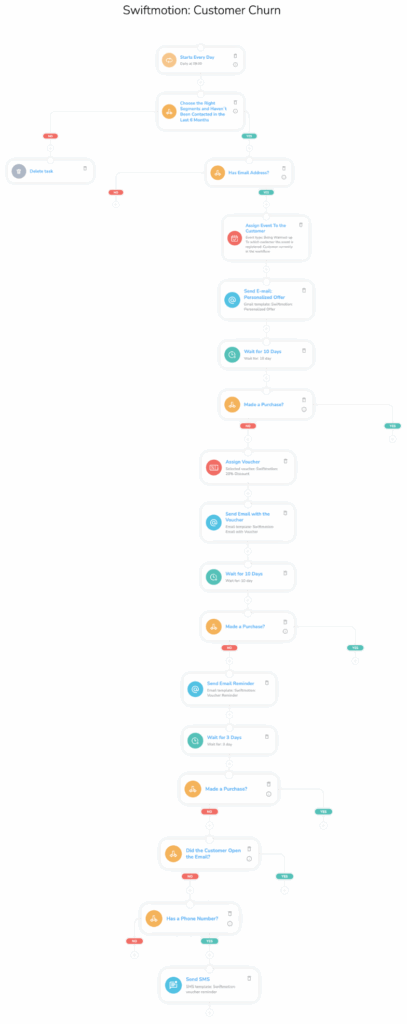
The most complex part is setting the first condition. Let’s break it down step by step. It is made up of two definitions:
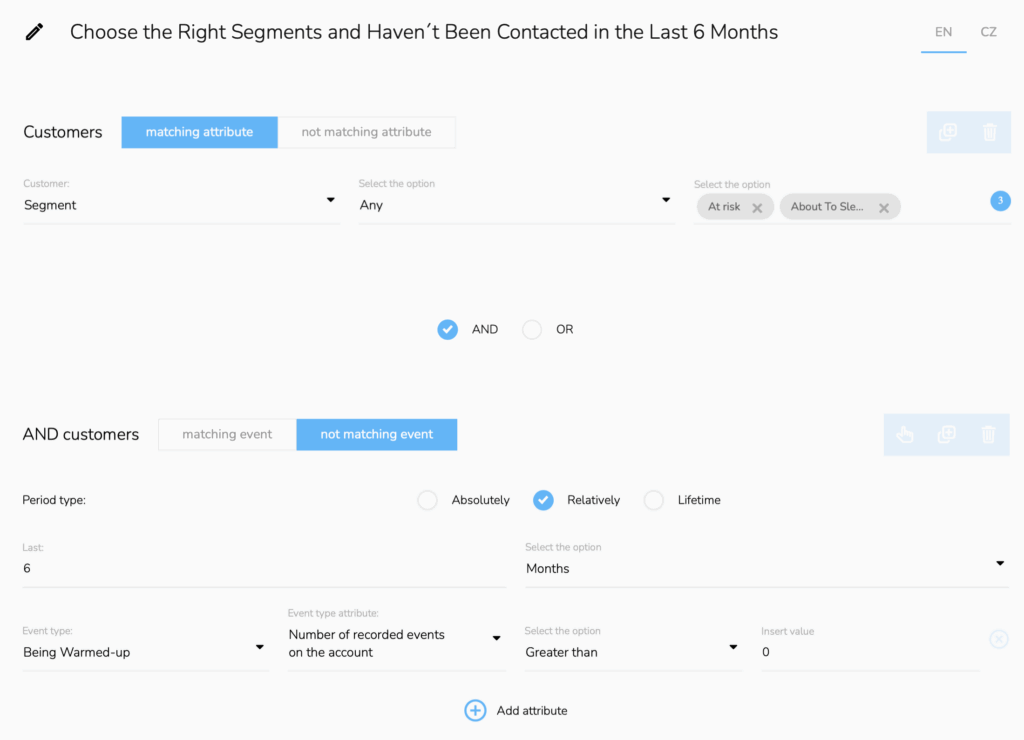
- The first chooses customers from the right segments (At Risk, About to Sleep, and Cannot Lose Them) to proceed. Choose “Add customer property condition”, then set Segment, Any, and the segments.
- The second condition ensures that only customers who haven’t been contacted by this workflow in the last six months can continue. This time, choose “Add another event type condition.” First, check the not-matching event, then set the Period type to Relatively and write down 6 months. Choose the event type as Being Warm-Up, Number of recorded events on the account, Greater than, 0.
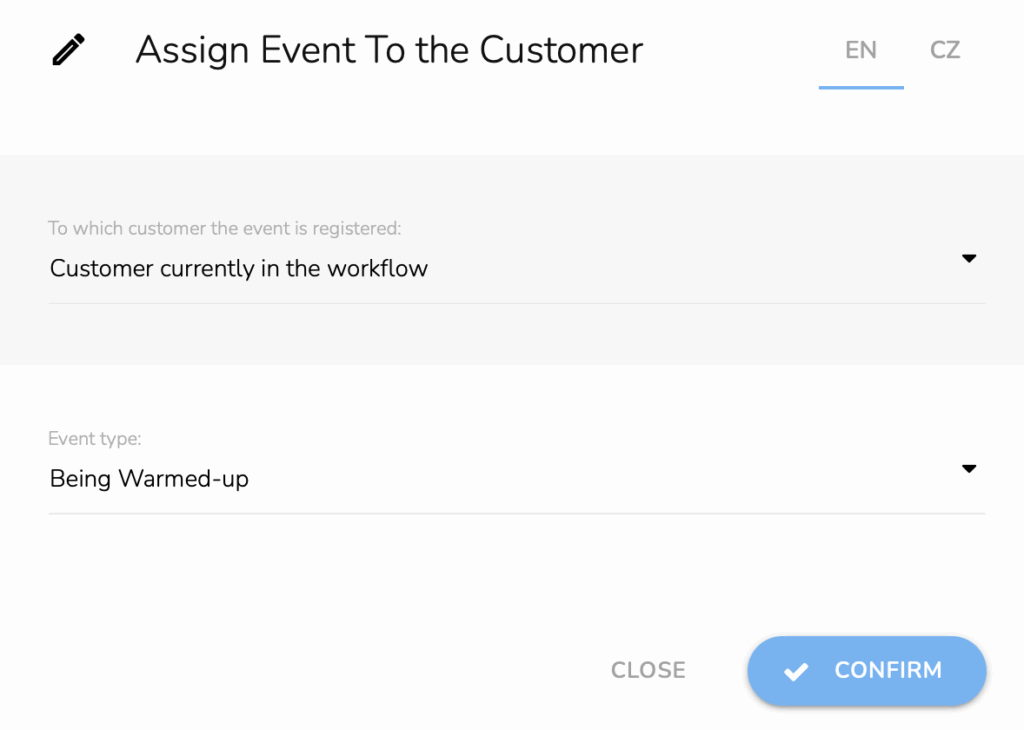
To ensure that each customer is contacted only once within a 6-month period, we will add an event node to the workflow. When a customer goes through the workflow, this event is recorded on their profile, so the next time the workflow runs (once a month), these customers won’t pass the initial condition. This helps maintain balanced and respectful communication with the customer.
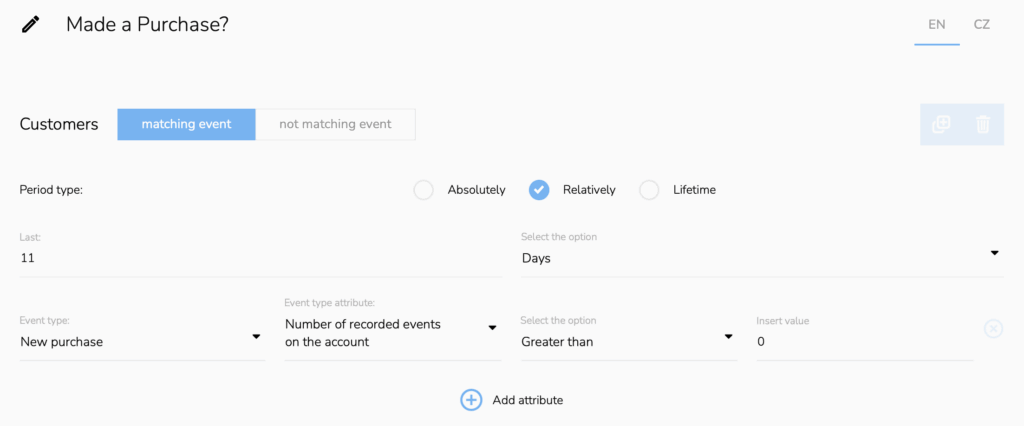
Next, let’s configure the “Made a Purchase?” condition. Once again, choose the “Add another event type condition”. Set the Period type to Relatively and choose the right number of days; don’t forget we have a Waiting node in the workflow. Finally, choose New purchase, Number of recorded events on the account, Greater than, 0.
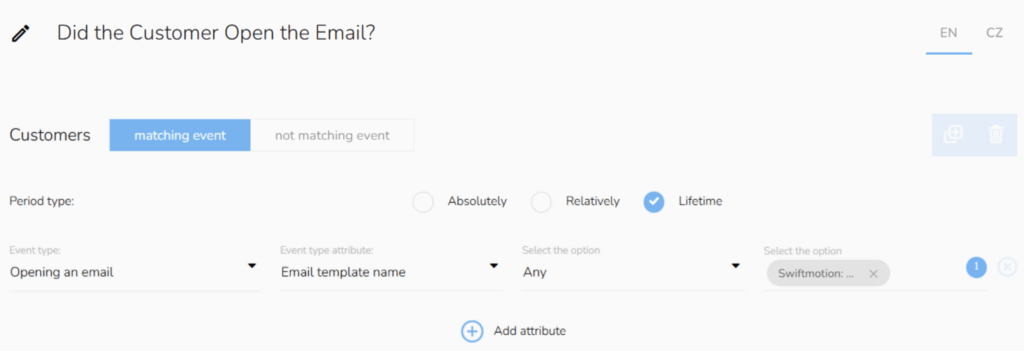
In this workflow, we have one more important condition: Did the Customer Open the Email? It checks whether the customer has opened the voucher email. Click on the “Add another event type condition,” set the Event Type to “Opening an email,” then set Email template name, option “Any,” and lastly select the specific email template.
FROM INSIGHTS TO ACTION
CDP & CRM CareCloud makes churn prevention a structured, data-driven process. With integrated tools like RFM segmentation, a Recommendation Engine, loyalty programs, and a visual workflow editor, all components work together seamlessly. This allows you to identify at-risk customers, personalize their experience, and automatically win them back.
Whether you’re building complex customer journeys or running simple retention campaigns, CareCloud provides everything you need in one platform to keep your customers engaged and coming back for more.
RECOMMENDED
What is hot?
We are excited to show you a brand new visual experience on…
Discover how to build a travel loyalty program that truly engages customers.…
GlassMorph Crystal Theme Discover a fresh new way to experience the CareCloud…
Omnichannel marketing delivers seamless experiences across multiple channels, but managing these campaigns…
Create an automated campaign that motivates customers toward reaching a higher membership…